找尋特徵值
- Harris: This algorithm is useful to detect corners
- SIFT (Scale-invariant feature transform): This algorithm is useful to detect blobs
- SURF (Speeded Up Robust Features): This algorithm is useful to detect blobs
- ORB (Oriented FAST and Rotated BRIEF): This algorithm stands for Oriented FAST and Rotated BRIEF
- FAST (Fast Library for Approximate Nearest Neighbors): This algorithm is useful to detect corners
- BRIEF (Binary Robust Independent Elementary Features): This algorithm is useful to detect blobs
- KAZE
- AKAZE (Accelerated-KAZE)
配對特徵值
- Brute-Force matching
- K-Nearest Neighbors matching
- FLANN-based matching
cornerHarris
對圖片I分別做Dx和Dy的convolution(其中Dx和Dy是Sobel kernel filter)可以得到

定義gradient covariance matrix為如下
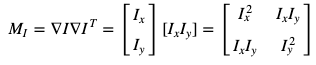
把MI再對高斯kernel filter做convolution,此處的高斯filter大小決定要看的corner區域大小(視野大小),做完convolution得到MI稱為Harris Matrix
計算

其中
得到cornor指標dst圖,dst圖的局部極值就是corner所在位置.
In [ ]:
import cv2
import numpy as np
img = cv2.imread('../../chess.png')
gray = cv2.cvtColor(img, cv2.COLOR_BGR2GRAY)
gray = np.float32(gray)
dst = cv2.cornerHarris(gray, 2, 23, 0.04)
#參數2:blockSize(要看的視野範圍,就是上面的高斯kernel size), 參數3:aperture_size (就是指Sobel kernel size), 參數4:計算dst的參數k (不重要)
img[dst>0.01 * dst.max()] = [0, 0, 255] #把dst>0.01 * dst.max()的pixel標成紅色
while (True):
cv2.imshow('corners', img)
if cv2.waitKey(1000) & 0xff == ord("q"):
break
cv2.destroyAllWindows()
以上的程式碼回得到下面的圖片

我們現在將圖片縮小成256*256pixel再做一次conorHarris
import cv2
import numpy as np
img = cv2.imread('../../chess.png')
img=cv2.resize(img,(256,256))
gray = cv2.cvtColor(img, cv2.COLOR_BGR2GRAY)
gray = np.float32(gray)
dst = cv2.cornerHarris(gray, 2, 23, 0.04)
#參數2:blockSize(要看的視野範圍,就是上面的高斯kernel size), 參數3:aperture_size (就是指Sobel kernel size), 參數4:計算dst的參數k (不重要)
img[dst>0.01 * dst.max()] = [0, 0, 255] #把dst>0.01 * dst.max()的pixel標成紅色
while (True):
cv2.imshow('corners', img)
if cv2.waitKey(1000) & 0xff == ord("q"):
break
cv2.destroyAllWindows()

發現中間的棋盤的特徵點都不見了,實在是不太好用.為了解決圖片尺寸縮放造成特徵點變異的問題,因此在2004年時開發出了SIFT演算法
SIFT (Scale-invariant feature transform)
SIFT具有尺寸不變特性,意思是將圖片進行縮放或者是旋轉後,他的特徵點還是依然可以辨識的出來.
閱讀資料:
In [2]:
import cv2
import sys
import numpy as np
img = cv2.imread('../../chess.png')
gray = cv2.cvtColor(img, cv2.COLOR_BGR2GRAY) #把顏色轉換成灰階
sift = cv2.xfeatures2d.SIFT_create() #產生SIFT class物件
#使用sift物件的detectAndCompute函數計算圖片gray的特徵點keypoints和特徵點描述descriptor
keypoints, descriptor = sift.detectAndCompute(gray,None)
#畫出特徵點keypoints
img = cv2.drawKeypoints(image=img, outImage=img, keypoints = keypoints, flags = 1, color = (51, 163, 236))
cv2.imshow('sift_keypoints', img)
while (True):
if cv2.waitKey(1000 // 12) & 0xff == ord("q"):
break
cv2.destroyAllWindows()
得到
cv2.drawKeypoints的flag參數[0-4]用來表示特徵值的特徵強度的定義如下:
Flag預設為0,改成flag=4會依據特徵點的size畫出大小不同的特徵點
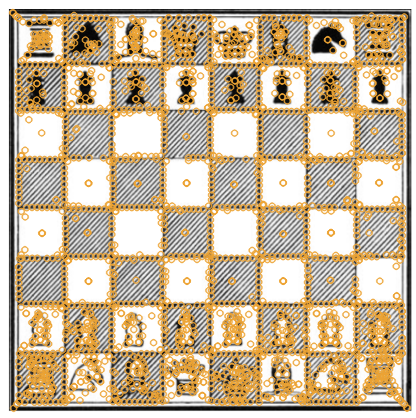
我們現在將圖片縮小成256*256pixel再做一次SIFT
In [ ]:
import cv2
import sys
import numpy as np
img = cv2.imread('../../chess.png')
img=cv2.resize(img,(256,256))
gray = cv2.cvtColor(img, cv2.COLOR_BGR2GRAY) #把顏色轉換成灰階
sift = cv2.xfeatures2d.SIFT_create() #產生SIFT class物件
#使用sift物件的detectAndCompute函數計算圖片gray的特徵點keypoints和特徵點描述descriptor
keypoints, descriptor = sift.detectAndCompute(gray,None)
#畫出特徵點keypoints
img = cv2.drawKeypoints(image=img, outImage=img, keypoints = keypoints, flags = 4, color = (51, 163, 236))
# Flag=4 是 cv2.DRAW_MATCHES_FLAGS_DRAW_RICH_KEYPOINT
cv2.imshow('sift_keypoints', img)
while (True):
if cv2.waitKey(1000 // 12) & 0xff == ord("q"):
break
cv2.destroyAllWindows()

使用SIFT擷取的特徵值不會因為圖片縮小就改變
keypoint 的class有參數:
- pt: 特徵值points位置
- size: 特徵值的直徑
- angle: 特徵值角度
- response: 特徵值強度
- octave: 找到特徵值(DOG極值)的那一層octave
- class_id: 特徵值的id
Fast Hessian and SURF
SURF是Herbert BayyyY在2006年開發出來的.SURF是基於SIFT衍生出來的尋找特徵值方法,他的運算速度比SIFT快上數倍
In [ ]:
import cv2
import sys
import numpy as np
img = cv2.imread('../../chess.png')
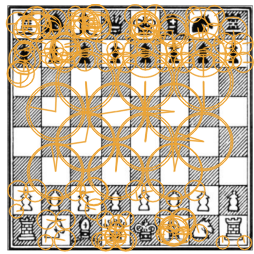
img=cv2.resize(img,(256,256))
gray = cv2.cvtColor(img, cv2.COLOR_BGR2GRAY) #把顏色轉換成灰階
sift = cv2.xfeatures2d.SURF_create(10000) #產生SURF class物件,設定Hessian threshold=10000
#使用sift物件的detectAndCompute函數計算圖片gray的特徵點keypoints和特徵點描述descriptor
keypoints, descriptor = sift.detectAndCompute(gray,None)
#畫出特徵點keypoints
img = cv2.drawKeypoints(image=img, outImage=img, keypoints = keypoints, flags = 4, color = (51, 163, 236))
# Flag=4 是 cv2.DRAW_MATCHES_FLAGS_DRAW_RICH_KEYPOINT
cv2.imshow('sift_keypoints', img)
while (True):
if cv2.waitKey(1000 // 12) & 0xff == ord("q"):
break
cv2.destroyAllWindows()
SURF
In [33]:
import cv2
import sys
import numpy as np
img = cv2.imread('../../chess.png')
img=cv2.resize(img,(256,256))
gray = cv2.cvtColor(img, cv2.COLOR_BGR2GRAY) #把顏色轉換成灰階
sift = cv2.xfeatures2d.SURF_create(10000) #產生SURF class物件,設定Hessian threshold=8000
#使用sift物件的detectAndCompute函數計算圖片gray的特徵點keypoints和特徵點描述descriptor
keypoints, descriptor = sift.detectAndCompute(gray,None)
descriptor.shape
(146, 64)
In [37]:
from PIL import *
from pylab import *
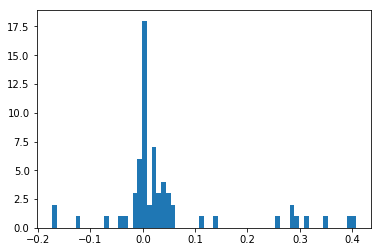
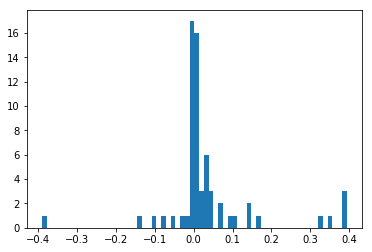
for i in range(len(keypoints)):
if i<2:
print('pt:',keypoints[i].pt,'\n''size:',keypoints[i].size,'\n'
'angle:',keypoints[i].angle,'\n''response:',keypoints[i].response,'\n'
'octave:',keypoints[i].octave,'\n''class_id:',keypoints[i].class_id,'\n')
plt.plot()
plt.hist(descriptor[i],bins=64)
plt.show()
else:
break
pt: (199.65272521972656, 23.584537506103516)
size: 33.0
angle: 65.58450317382812
response: 60962.69921875
octave: 1
class_id: 1
pt: (230.95289611816406, 59.70587921142578)
size: 16.0
angle: 179.25604248046875
response: 60528.109375
octave: 0
class_id: 1
ORB feature detection and feature matching
FAST (Features from Accelerated Segment Test (FAST)): FAST是一種用來找特徵點(corner)的演算法
尋找pixel周圍的16個pixel,看這16個pixel共有幾個亮度大於threshold.FAST演算法捨棄了16個pixel而只看1,9,5,13(上下右左)四個pixel的亮度有多少個大於和多少個小於threshold.若四個pixel都大於或都小於threshold, 或者是兩個大於兩個小於threshold,則不列為corner的候選人.只有3個大於1個小於或1個小於3個大於才可以列為corner人選.

BRIEF(Binary Robust Independent Elementary Features): BRIEF是一種用來描述特徵點(corner)的演算法
Brute-Force matching: 比較兩個特徵點的描述,然後產生匹配的清單.正如其名他是用蠻力的方式去計算每個feature的描述和其他feature的描述之家的距離,最後選出距離最近的兩個feature作為匹配的清單.這就有點像是猜密碼一樣,一個一個的嘗試.
In [48]:
import numpy as np
import cv2
from matplotlib import pyplot as plt
img1 = cv2.imread('../../little_elephant.jpg',cv2.IMREAD_GRAYSCALE)
"""
也可以把cv2.IMREAD_GRAYSCALE用0取代
其他的參數:
IMREAD_ANYCOLOR = 4
IMREAD_ANYDEPTH = 2
IMREAD_COLOR = 1
IMREAD_GRAYSCALE = 0
IMREAD_LOAD_GDAL = 8
IMREAD_UNCHANGED = -1
"""
img2 = cv2.imread('../../elephant.jpg', cv2.IMREAD_GRAYSCALE)
orb = cv2.ORB_create()
#FAST and BRIEF
kp1, des1 = orb.detectAndCompute(img1,None)
kp2, des2 = orb.detectAndCompute(img2,None)
#Brute-Force matching:
bf = cv2.BFMatcher(cv2.NORM_HAMMING, crossCheck=True)
matches = bf.match(des1,des2)
matches = sorted(matches, key = lambda x:x.distance)
img3 = cv2.drawMatches(img1,kp1,img2,kp2, matches[:40], img2,flags=2)
plt.imshow(img3)
plt.show()

Using K-Nearest Neighbors matching
In [54]:
import numpy as np
import cv2
from matplotlib import pyplot as plt
img1 = cv2.imread('../../little_elephant.jpg',0)
img2 = cv2.imread('../../elephant.jpg',0)
orb = cv2.ORB_create()
kp1, des1 = orb.detectAndCompute(img1,None)
kp2, des2 = orb.detectAndCompute(img2,None)
bf = cv2.BFMatcher(cv2.NORM_HAMMING, crossCheck=True)
matches = bf.knnMatch(des1,des2, k=1)
img3 = cv2.drawMatchesKnn(img1,kp1,img2,kp2, matches, img2,flags=2)
plt.imshow(img3),plt.show()

Out[54]:
(<matplotlib.image.AxesImage at 0x120a89198>, None)
FLANN-based matching (Fast Library for Approximate Nearest Neighbors)
FLANN官網: http://www.cs.ubc.ca/research/flann/
過濾掉不好的match: https://www.cs.ubc.ca/~lowe/papers/ijcv04.pdf
FLANN is written in C++ and contains bindings for the following languages: C, MATLAB and Python.” FLANN has been proven to be 10 times times faster than other nearest neighbors search software.
In [57]:
import numpy as np
import cv2
from matplotlib import pyplot as plt
queryImage = cv2.imread('../../little_elephant.jpg',0)
trainingImage = cv2.imread('../../elephant.jpg',0)
# create SIFT and detect/compute
sift = cv2.xfeatures2d.SIFT_create()
kp1, des1 = sift.detectAndCompute(queryImage,None)
kp2, des2 = sift.detectAndCompute(trainingImage,None)
# FLANN matcher parameters
# FLANN_INDEX_KDTREE = 0
indexParams = dict(algorithm = 0, trees = 5)
searchParams = dict(checks=50) # or pass empty dictionary
flann = cv2.FlannBasedMatcher(indexParams,searchParams)
matches = flann.knnMatch(des1,des2,k=2)
# prepare an empty mask to draw good matches
matchesMask = [[0,0] for i in range(len(matches))]
# David G. Lowe's ratio test, populate the mask
for i,(m,n) in enumerate(matches):
if m.distance < 0.7*n.distance:
matchesMask[i]=[1,0]
drawParams = dict(matchColor = (0,255,0),
singlePointColor = (255,0,0),
matchesMask = matchesMask,
flags = 0)
resultImage = cv2.drawMatchesKnn(queryImage,kp1,trainingImage,kp2,matches,None,**drawParams)
plt.imshow(resultImage,),plt.show()

Out[57]:
(<matplotlib.image.AxesImage at 0x120787550>, None)
In [7]:
import numpy as np
import cv2
from matplotlib import pyplot as plt

img = cv2.imread('../../elephant.jpg')
gray= cv2.cvtColor(img, cv2.COLOR_BGR2GRAY)

akaze = cv2.AKAZE_create()
kp, descriptor = akaze.detectAndCompute(gray, None)

img=cv2.drawKeypoints(gray, kp, img)
cv2.imwrite('keypoints.jpg', img)
plt.imshow(img),plt.show()

Out[7]:
In [17]:
import numpy as np
import cv2 as cv
import matplotlib.pyplot as plt

img1 = cv.imread('../../little_elephant.jpg', cv.IMREAD_GRAYSCALE)  # referenceImage
img2 = cv2.imread('../../elephant.jpg',cv2.IMREAD_GRAYSCALE)  # sensedImage

# Initiate AKAZE detector
akaze = cv.AKAZE_create()
# Find the keypoints and descriptors with SIFT
kp1, des1 = akaze.detectAndCompute(img1, None)
kp2, des2 = akaze.detectAndCompute(img2, None)
# BFMatcher with default params
bf = cv.BFMatcher()
matches = bf.knnMatch(des1, des2, k=2) #回傳兩個最近的距離

# Apply ratio test
good_matches = []
for m,n in matches:
    #如果第一個近的距離比第二個近的距離*0.75還要小,則把第一個近的特徵點加入good_matches清單
    if m.distance < 0.75*n.distance:
        good_matches.append([m])

# Draw matches
img3 = cv.drawMatchesKnn(img1,kp1,img2,kp2,good_matches,None,flags=cv.DrawMatchesFlags_NOT_DRAW_SINGLE_POINTS)
plt.imshow(img3,),plt.show()
cv.imwrite('matches.jpg', img3)

Out[17]:


